
Hey Everyone!
Hope you all are well :)
Hope you all are well :)
I always get lots of questions about my brows, the most comment questions are in relation to the products I use and how I care for them etc. In a bid to answer those questions I recently filmed my current eyebrow routine and uploaded it on my YouTube channel. If you have missed that video I'll link it for you down below.
Just over a week ago though I received a package in the post from Urban Decay and it contained a couple of their new products, including the Brow Beater and Brow Tamer. Various companies already have products on the market that are similar to the ones I'm about to show you. I have never tried this kind of brow pencil before and have never tried a brow gel in general, purely because I have a brow routine that works for me so I've never felt the need to try out something different. If it's not broken don't fix it and all that jazz! However when these products arrived on my doorstep I figured I would give them a whirl. I'm going to give you a step by step pictorial on how I use them so I hope you find it helpful. Before we get started though, let's find out a little more about the brow products!
I'll begin with the Brow Beater Microfine Brow Pencil because this is what I like to use first.

As I have said, I've never tried a product similar to this before even though there are numerous available on the market. When I opened the box of the brow beater I instantly thought of the Anastasia Beverley Hills Brow Wiz. If the pencil is similar to the brow wiz that could be fantastic, if you are living in Ireland Urban Decay products are widely available whereas ABH products are a little more tricky to find so this could be a good alternative.

The Urban Decay Brow Beater is packaged within a slim metallic purple barrel with a spoolie on one end and a retractable pencil on the other. It comes in four shades:
- Taupe
- Neutral Brown
- Warm Brown
- Dark
I received both my products in the darkest shade available which is 'Dark', funnily enough haha. Initially I was a bit worried that this particular shade would be far too dark for my colouring but thankfully it wasn't.

I adore the fact the Brow Beater is double ended. The inclusion of a spoolie I find makes the brow product perfect for on the go. I use the wand before I apply any product to my brows, I simply brush the brow hairs in one direction to ensure they are sitting nicely in place. Doing this makes filling in the brows that little bit easier to do. I also like to use the spoolie to disperse the brow product. Similar to a blending brush, I like to apply the brow pencil and then brush through the brows with the spoolie to make sure the product has been distributed evenly through the hairs. If you are a bit heavy handed like I can be sometimes, the spoolie works great for softening the pencil. Brushing through the brows will fade the product so you can repeat the process until you reach the desired intensity.

Due to the fact the product comes in the form of a retractable pencil, there is no mess or fuss. You don't have to worry about pairing you just simply twist the product up and down.

Living up to its name, the pencil is extremely fine making precision work very easy to do. With small strokes you can easily draw individual brow hairs to give the appearance of fuller brows. When I swatched the pencil the first thing I was delighted to see was that the brow was quite neutral, there wasn't a warm tone in sight! The pencil isn't harsh on the skin but it isn't too creamy either so it won't slip and slide, the balance between the two is just right.
Now for the pictorial! Brows are quite personal, this is just how I like to fill mine in. Feel free to add and remove steps to suit your routine :)
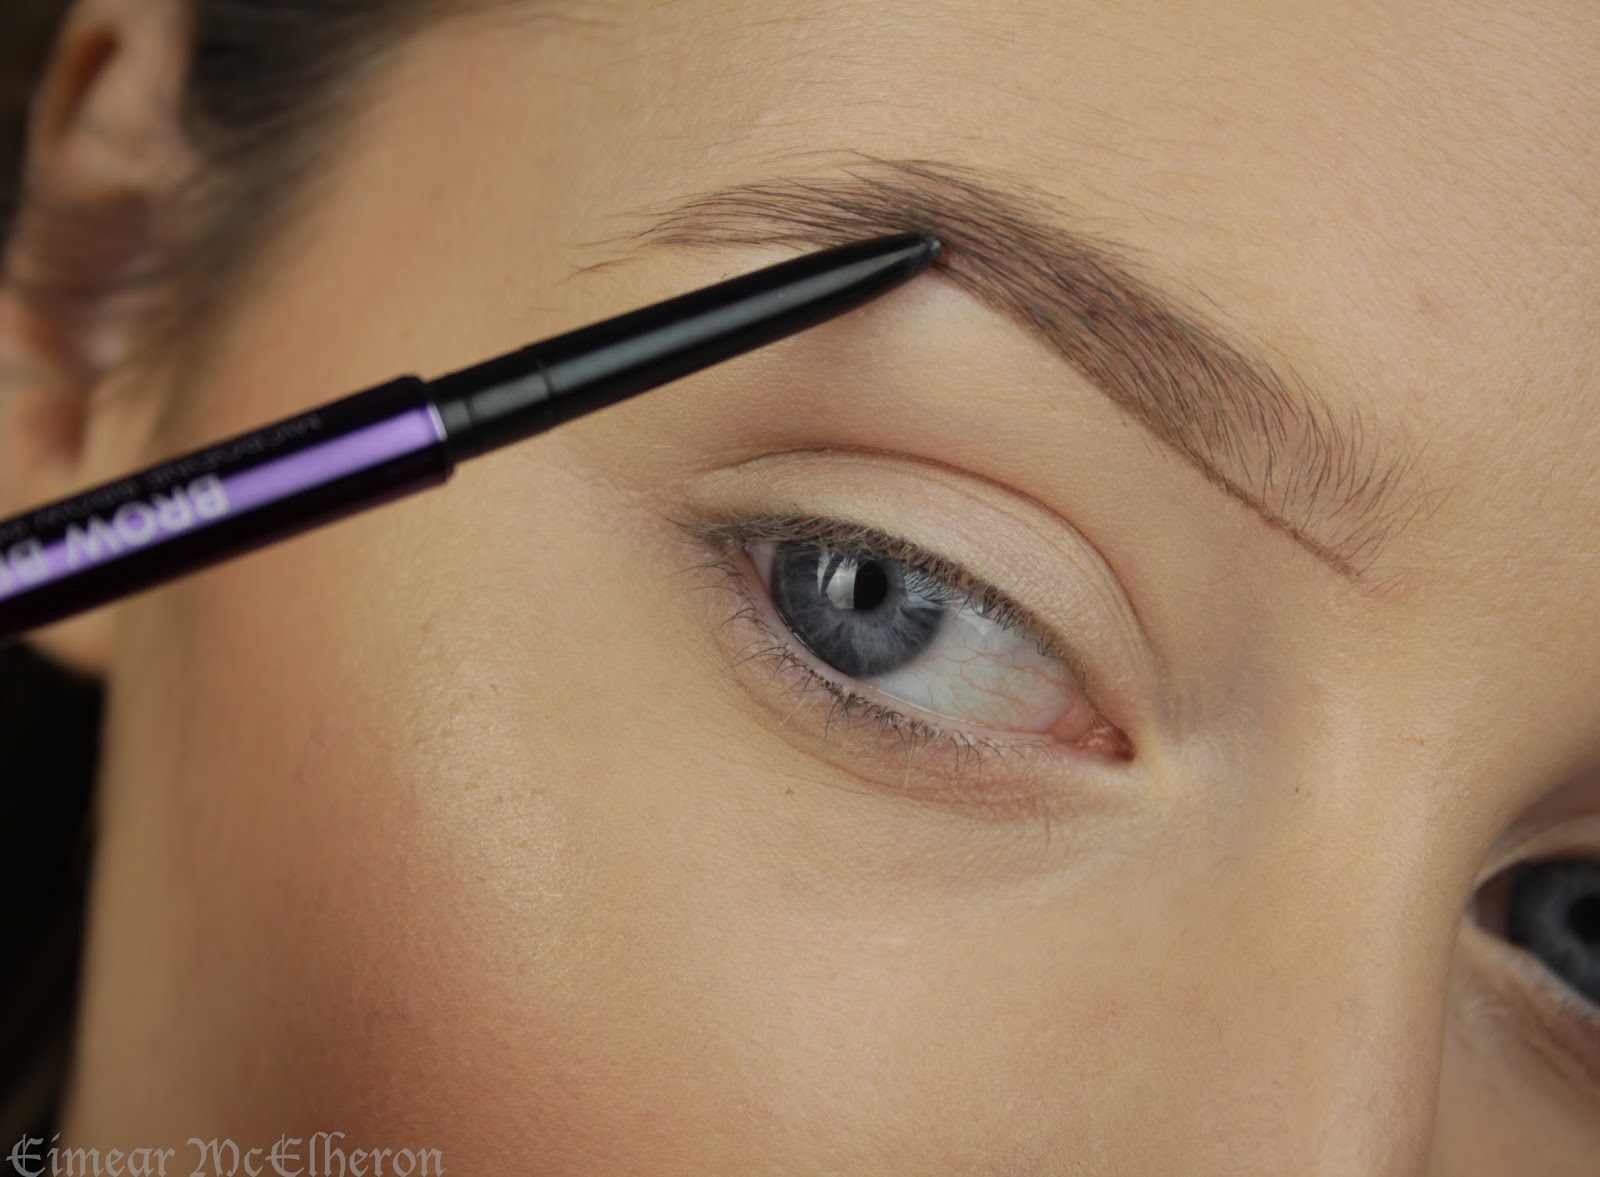
Step 1: Comb through the brows with the spoolie end to make sure all the hairs are lying in the one direction.

Step 2: Use the pencil end to begin sculpting the brow. I like to start out by defining along the base of my brow.

Step 3: Use short feather like strokes to apply the pencil to any sparse areas. You can just use the pencil to fill in any gaps but I like to fill in the entire brow. I begin in the middle of the brow and work my way towards the tail.
Step 4: Take the spoolie end again and brush through the brows. I don't apply the pencil to the front of my brow directly, as I find this can look quite harsh. Through brushing, this will disperse the product through the brow hairs and will give a more natural look but it will also allow you to see any gaps you may have missed.

Step 5: Repeat the process. I like to apply the product and brush though the brow hairs several times. The more intense you want your brows to appear, the more layers you will apply and the more natural the less you will apply. To achieve my desired look and the intensity that I like, I repeated the process three times :)


Finally, I have the Urban Decay Brow Tamer Flexible Hold Brow Gel to show you.


Packaging wise it's the same as the Brow Beater and the shade range is exactly the same, so the two products can double up and wear together quite nicely. Along with the shades of: Taupe, Neutral Brown, Warm Brown, and Dark, there is also a clear shade available. This will be perfect for those who just want to set the brow hairs in place without adding any colour.

If you watched my brow routine video or even just from viewing the photo of me brushing through my hairs prior to the application of product, you will see that I actually do have an ok shape to my brows, they are just a little sparse.
I like the base of my brow to be quite defined which is why I would not use a brow gel to fill in my brows on its own. Another reason why I wouldn't solely use a brow gel is because one of my brows rests a little lower than the other. If I didn't correct the shape first with a pencil and went straight in with a gel, my brows would appear uneven and I wouldn't want that. Rather than using the brow tamer to define my brows, I like to use it after I apply some pencil to finish off the brows and to give myself a really polished look.
After I have applied the Brow Beater I like to start in the middle of my brow again and brush the Brow Tamer towards the end of my brow. Once I have the majority of the gel off of the spoolie I can then brush the product up towards the beginning of my brow.

The only problem I encountered with the Brow Tamer was in relation to the size of the spoolie. I found it a little difficult to apply the gel to the tail of my brow and my brows aren't incredibly thin. I think if the spoolie was a little thinner/smaller it would work a whole lot better.

As for the formula itself, the product tinted the brows nicely and held the brow hairs in the direction that I brushed them for hours on end. I didn't have a problem with the product smudging or smearing and thankfully there wasn't a build up of product in the brow hairs, I didn't have that crispy feeling that I thought might occur with the use of a gel.

Overall I'm extremely impressed with both products and would highly recommend. The Brow Beater wears exceptionally well on its own and lasts even longer with the brow tamer applied on top of it. The Brow Beater and the Brow Tamer both have an RRP of €18.50 and will be available from Debenhams and House of Fraser. While I adore both product I won't be ditching my brow powder anytime soon. I like the fact that I now have a couple of different mediums that I equally enjoy that I can use to fill in my brows.
What is your holy grail brow product?
I would also be very interested to hear if you have tried the ABH Brow Wiz and the Urban Decay Brow Beater, and if you think they are comparable!
Chat soon :)
Eimear x

No comments :
Post a Comment